使用 Travis CI 自动部署 HEXO 博客
If you see this post, then it works!
用得好好,就不要瞎折腾
缘起
最近因为 Coding Pages 的自定义域名收费了,一时也找不到比较好的支持 SSL 的 Pages 服务(GitLab Pages 虽然支持 SSL,但是要自己提供证书,感觉还不是很方便)。看了这个帖子后,还是决定将博客放到自己的 VPS 上。
流程

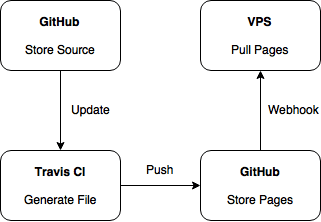
博客的源代码放在 GitHub 上,一更新就通过 Travis CI 自动 generate 并 push 到另外一个 repo,这个 repo 通过 webhook 的方式通知 vps,vps 更新文件。
整个流程可以说是非常非常麻烦,我弄好后突然发现可以通过 Dropbox 进行本地与 vps 的同步。。。
一些参考
.travis.yml
language: node_jsnode_js:- '6'cache:directories:- node_modulesbranches:only:- masterinstall:- npm installscript:- hexo cl- hexo gafter_script:- cd ./public- git init- git config user.name "giuem"- git config user.email "email_adress"- git add .- git commit -m "auto deploy via Travis CI."- git push --force --quiet "path-to-your-repo" master:pages
为了方便,我直接把存放源文件和静态页面放在同一个 repo 的不同分支下,这样就不用在添加 ssh 密钥了。
deploy
这个我直接做成 Docker 镜像了
发现有几个配置写死了,直接给代码好了
deploy.sh
#!/bin/shrm pages -rfgit clone -b pages https://$GITHUB_TOKEN@github.com/giuem/blog.git pages
webhook.js
const http = require('http');const crypto = require('crypto');const exec = require('child_process').exec;const secret = process.env.SECRET || false;const port = process.env.PORT || 8089;function verify_signature(sign, body) {if (!secret) return true;return (sign ==='sha1=' + crypto.createHmac('sha1', secret).update(body).digest('hex'));}http.createServer((req, res) => {if (req.method === 'POST' &&req.url === '/auto-deploy' &&req.headers['x-github-event'] === 'push') {let body = '';let sign = req.headers['x-hub-signature'];req.on('data', (buffer) => {body += buffer;if (body.length > 1e6) {req.connection.destroy();}});req.on('end', () => {if (verify_signature(sign, body)) {let json = JSON.parse(body);if (json['ref'].indexOf('pages') !== -1) {console.log('Verify successfully, now start deploying...');exec('sh ./deploy.sh');}}res.end();});} else {res.end();}}).listen(port, () => {console.log('service start at', port);});
总结
折腾了一圈突然发现还是动态博客好,重新体验了下。发现 WordPress 还是不支持 Markdown,Ghost 新版用了 mobiledoc 听都没听过,最后又滚回 HEXO 了。。。
没事真的别折腾,不如多写几道高数题!